
Navigating CanopyOS
Admin Functions
Accessing the System
Once your instance is ready, an initial invitation will be sent to an admin member of your team.
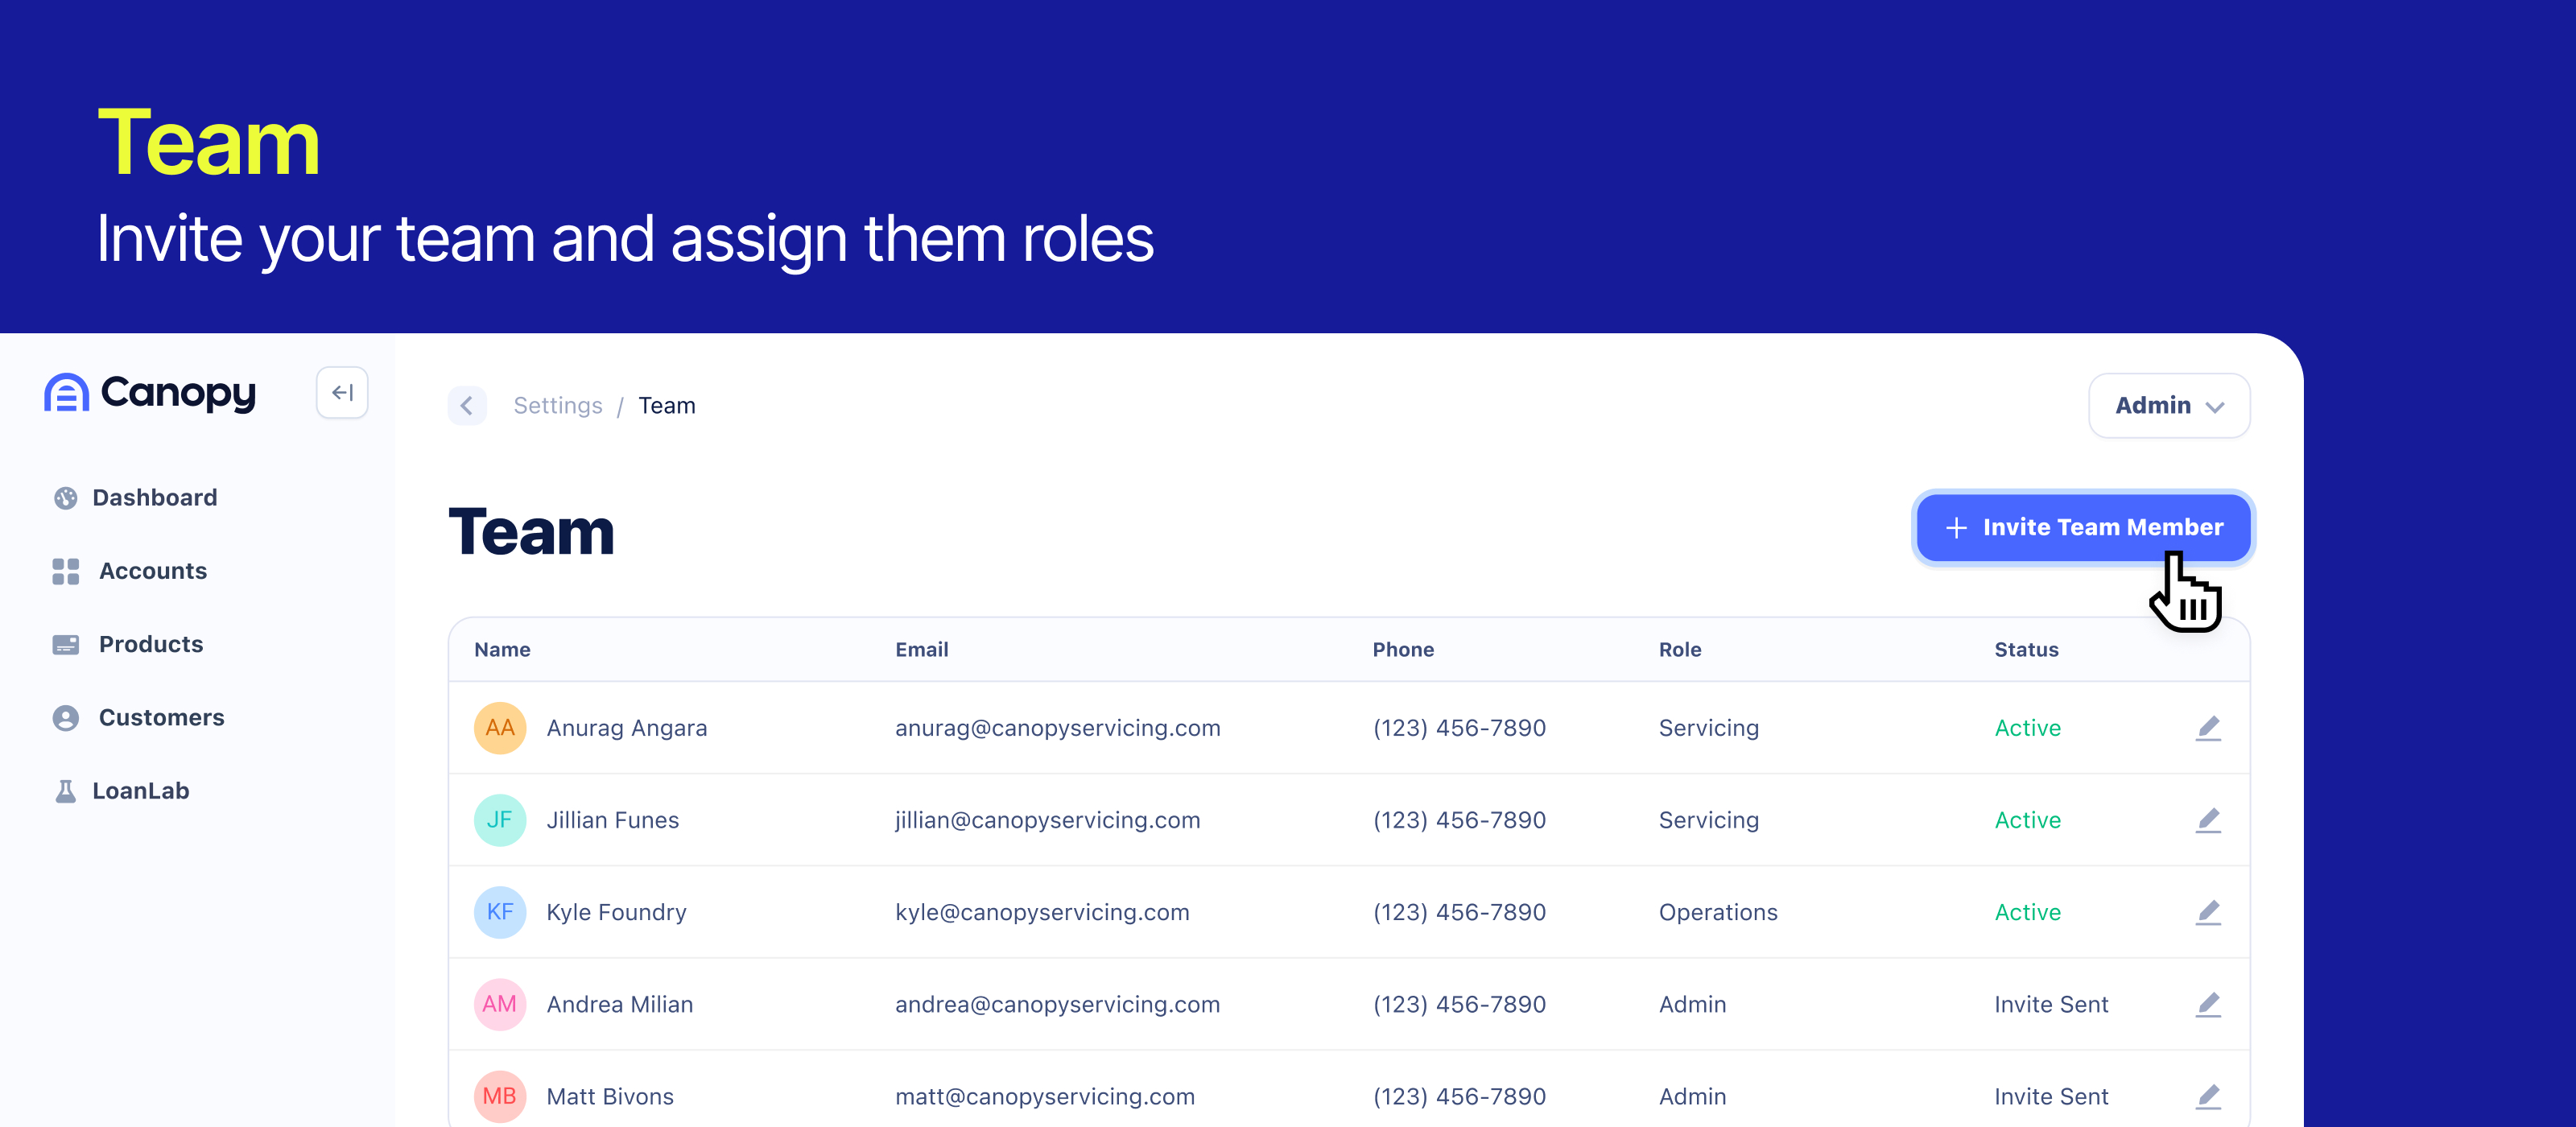
Additional team members can be added by navigating to the "Team" page located in the Admin menu in the upper right-hand corner of CanopyOS.
Managing Member Access
When you add a new team member, you will be asked to select their role of either Admin, Servicing, or Operations.
Role Permissions
| Admin | Servicing | Operations | |||||||
|---|---|---|---|---|---|---|---|---|---|
| API Action | Read | Add/Edit | Delete | Read | Add/Edit | Delete | Read | Add/Edit | Delete |
| api_users | √ | √ | √ | √ | √ | ||||
| products | √ | √ | √ | √ | √ | ||||
| products/{product_id} | √ | √ | √ | ||||||
| products/{product_id}/migration_mode | √ | √ | √ | ||||||
| accounts | √ | √ | √ | √ | √ | √ | |||
| accounts/{account_id} | √ | √ | √ | √ | √ | √ | |||
| accounts/{account_id}/notes | √ | √ | √ | √ | √ | ||||
| accounts/{account_id}/amortization_schedule | √ | √ | √ | √ | √ | ||||
| accounts/{account_id}/cards | √ | √ | √ | √ | √ | ||||
| accounts/{account_id}/cycles | √ | √ | √ | ||||||
| accounts/{account_id}/interest_rates | √ | √ | √ | √ | √ | ||||
| accounts/{account_id}/line_items | √ | √ | √ | √ | √ | ||||
| accounts/{account_id}/line_items/charges | √ | √ | √ | √ | √ | ||||
| accounts/{account_id}/line_items/payments | √ | √ | √ | √ | √ | ||||
| accounts/{account_id}/line_items/payments/payment_record | √ | √ | √ | ||||||
| accounts/{account_id}/line_items/payments/payment_transfer | √ | √ | |||||||
| accounts/{account_id}/line_items/refunds | √ | √ | √ | √ | √ | ||||
| accounts/{account_id}/line_items/loans | √ | √ | √ | √ | √ | ||||
| accounts/{account_id}/line_items/manual_fees | √ | √ | √ | √ | √ | ||||
| accounts/{account_id}/line_items/credit_offsets | √ | √ | √ | √ | √ | ||||
| accounts/{account_id}/line_items/debit_offsets | √ | √ | √ | √ | √ | ||||
| accounts/{account_id}/line_items/payment_reversals/{line_item_id} | √ | √ | √ | √ | |||||
| accounts/{account_id}/line_items/charge_reversals/{line_item_id} | √ | √ | √ | √ | |||||
| accounts/{account_id}/line_items/fee_waivers/{line_item_id} | √ | √ | √ | √ | |||||
| accounts/{account_id}/line_items/restructures/{line_item_id} | √ | √ | √ | √ | |||||
| accounts/{account_id}/line_items/{line_item_id} | √ | √ | √ | √ | √ | ||||
| accounts/{account_id}/line_items/{line_item_id}/schedule | √ | √ | √ | √ | √ | ||||
| accounts/{account_id}/statements/list | √ | √ | √ | √ | √ | ||||
| accounts/{account_id}/statements/{statement_id} | √ | √ | √ | √ | √ | ||||
| accounts/{account_id}/payment_processor_config | √ | √ | √ | √ | √ | ||||
| accounts/{account_id}/payment_processor_config/dwolla/plaid_ach_token | √ | √ | |||||||
| internal/plaid/link_token | √ | √ | √ | ||||||
| accounts/{account_id}/documents/upload_url | √ | √ | √ | √ | √ | ||||
| accounts/{account_id}/documents/download_url | √ | √ | √ | √ | √ | ||||
| accounts/{account_id}/documents/list | √ | √ | √ | √ | √ | ||||
| accounts/{account_id}/status | √ | √ | √ | √ | |||||
| accounts/{account_id}/policy | √ | √ | √ | √ | |||||
| accounts/{account_id}/pay_non_financed_amount | √ | √ | √ | √ | |||||
| accounts/{account_id}/notification_config | √ | √ | √ | √ | √ | ||||
| payout_entities | √ | √ | √ | √ | √ | √ | |||
| payout_entities/{payout_entity_id} | √ | √ | √ | ||||||
| customers | √ | √ | √ | √ | √ | ||||
| customers/accounts | √ | √ | √ | √ | √ | ||||
| marketing/contact | √ | √ | √ | ||||||
| marketing/access | √ | √ | √ | ||||||
| customers/{customer_id} | √ | √ | √ | √ | √ | √ | √ | ||
| customers/{customer_id}/accounts | √ | √ | √ | √ | √ | ||||
| customers/{customer_id}/beneficial_owners | √ | √ | √ | √ | √ | √ | √ | ||
| customers/{customer_id}/beneficial_owners/{beneficial_owner_id} | √ | √ | √ | √ | √ | √ | √ | ||
| customers/{customer_id}/partner_entities | √ | √ | √ | √ | √ | ||||
| customers/{customer_id}/partner_entities/{partner_entity_id} | √ | √ | √ | √ | √ | ||||
| customers/{customer_id}/product_offerings | √ | √ | √ | √ | √ | ||||
| customers/{customer_id}/product_offerings/{product_id} | √ | √ | √ | ||||||
| customers/{customer_id}/amortization_schedules | √ | √ | √ | ||||||
| customers/{customer_id}/finance_requests | √ | √ | √ | ||||||
| customers/{customer_id}/finance_requests/{finance_request_id}/documents | √ | √ | √ | ||||||
| customers/{customer_id}/finance_requests/{finance_request_id}/documents/upload_url | √ | √ | √ | ||||||
| partner_entities | √ | √ | √ | √ | √ | ||||
| partner_entities/{partner_entity_id} | √ | √ | √ | √ | √ | ||||
| accounts/{account_id}/audit_trails/account_status_changes | √ | √ | √ | √ | √ | √ | √ | √ | √ |
| organization | √ | √ | √ | ||||||
| organization/account_policies | √ | √ | |||||||
| organization/issuer_processors | √ | √ | √ | √ | |||||
| organization/payment_processors | √ | √ | √ | √ | √ | ||||
| organization/subscribe | √ | √ | √ | √ | √ | √ | |||
| organization/subscribe/get_webhook_secret | √ | √ | √ | ||||||
| organization/subscribe/replay_failed_events | √ | √ | √ | √ | √ | ||||
| organization/subscribe/test | √ | √ | √ | ||||||
| organization/data_direct | √ | √ | √ | ||||||
| organization/address | √ | √ | √ | √ | |||||
| organization/plaid_config | √ | √ | √ | √ | |||||
| organization/nacha_config | √ | √ | √ | √ | |||||
| organization/vanity-domain | √ | √ | √ | ||||||
| organization/vanity-domain/{domain_name} | √ | √ | √ | ||||||
| nacha_files/entry_details | √ | √ | √ | ||||||
| finance_requests | √ | √ | √ | √ | √ | ||||
| finance_requests/{finance_request_id} | √ | √ | √ | √ | √ | ||||
| finance_requests/{finance_request_id}/convert | √ | √ | √ | ||||||
| filters | √ | √ | √ | ||||||
| notes | √ | √ | √ | √ | √ | √ | |||
Developer Functions within CanopyOS
API Keys
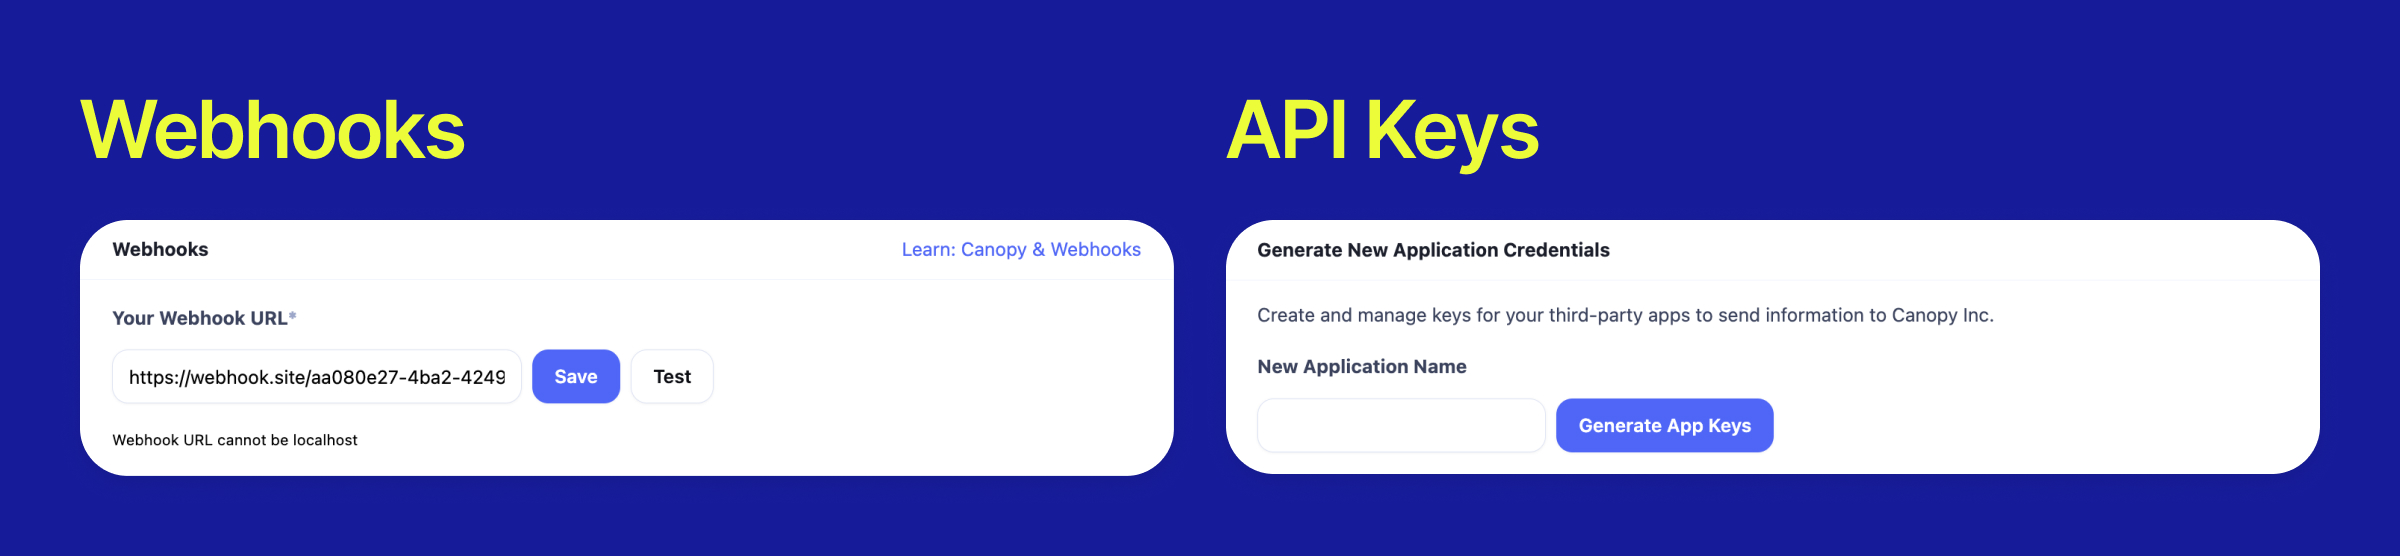
Any time you need to connect to Canopy's API through a new application, you can click on Generate New App Keys by navigating to the App Keys page under the Admin menu.
Webhooks
Canopy can send you a notification when changes occur through webhooks. Setting up where you would like these notifications to be sent can be done through the Webhook section shown below on the App Keys page found in the Admin menu.
Customers
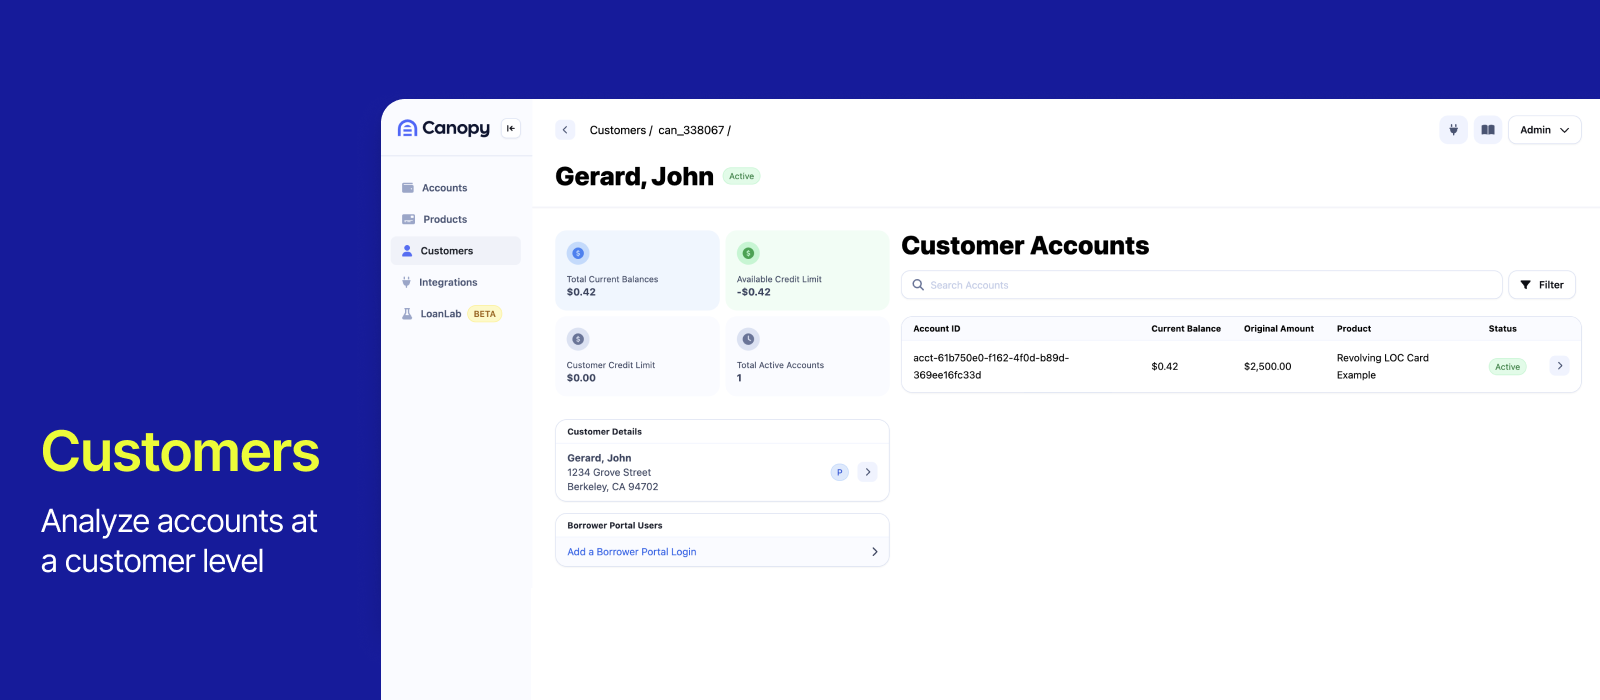
When using CanopyOS, you can navigate to Customers and view all information related to a customer. This includes account information, customer details, and total balance information.
Customer Overview
When you log into CanopyOS, you will see all accounts have the customer card with an option to expand for more details about the customer.
Add New Customer
You can create multiple customers per account. To do this within CanopyOS, click the Manage button and click "Add Customer." After filling in all customer information, click "Add Customer."
Borrower Portal
Once a customer is created, they can also be onboard to our off-the-shelf customer-facing solution. We call it Borrower Portal. It's a white-label solution that helps borrowers gain visibility to their accounts and credit solutions.
Enabling Borrower Portal access can be done automatically as an additional API call upon customer creation, or it can be done manually through the customer page in CanopyOS as well.
Accounts
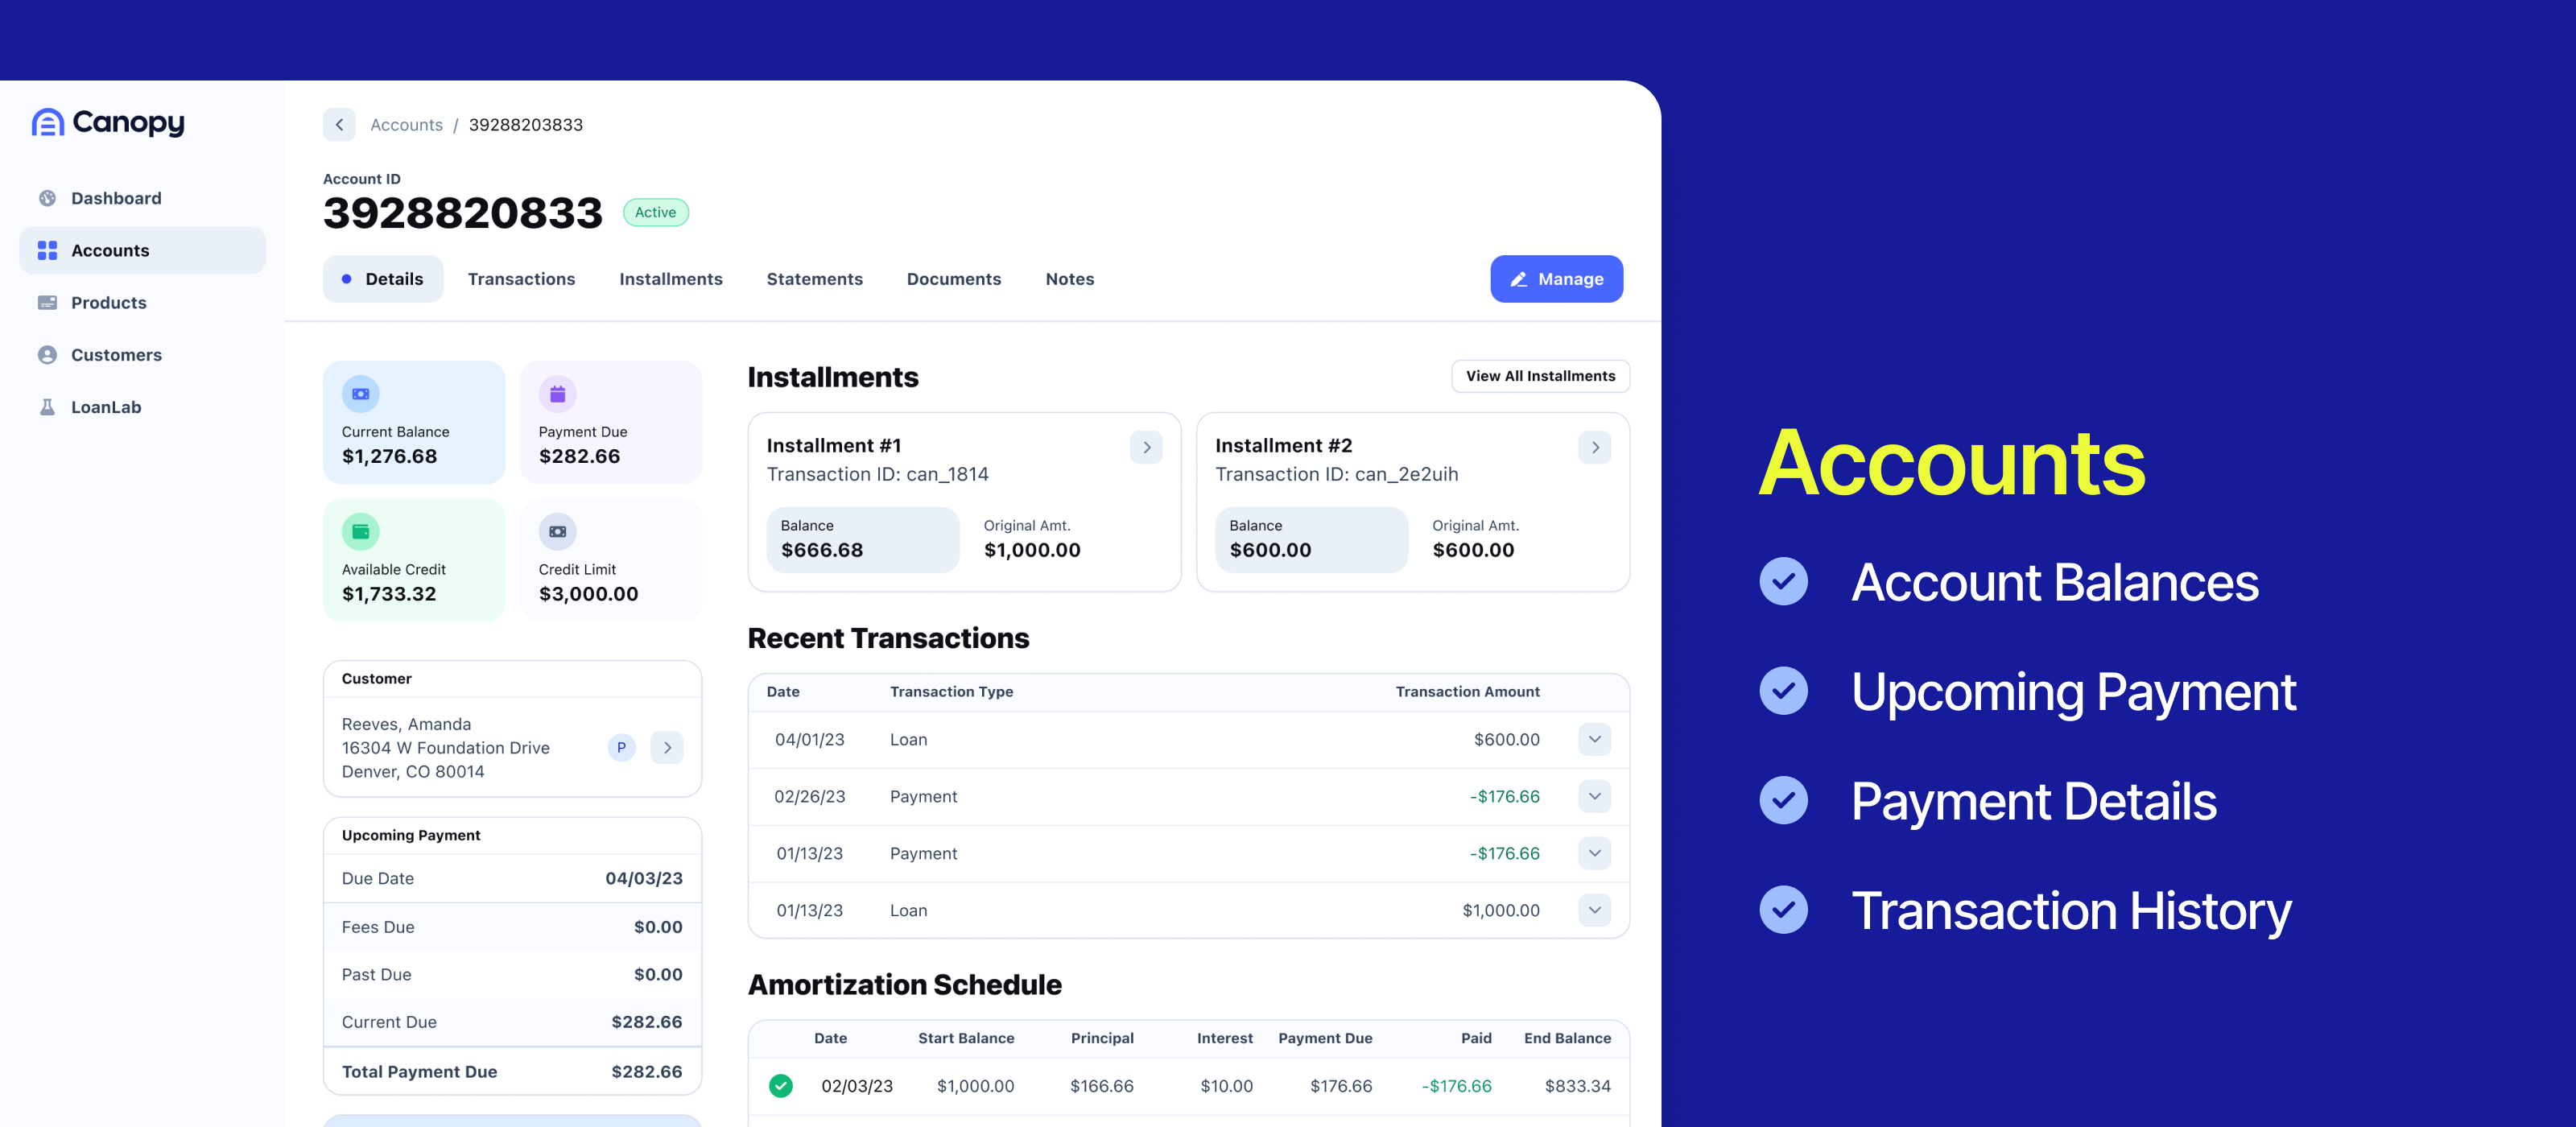
The Account view in CanopyOS provides all of the detail-level information needed to understand borrower activity on a particular account.
Key Information
The left-hand side of an Account view within CanopyOS provides some key contextual information about the account.
Account Balances
Key account balances can be found in the upper left-hand corner of the Account view. Note again that these can change based on the account product and configuration.
Upcoming Payments
The Upcoming Payments section will provide you with all of the information regarding a borrower's next upcoming payment, including the due date and a breakdown of the amount due.
External Fields
When creating an account in Canopy, you can also include any additional contextual information in the external fields. These values will be shown as seen below in CanopyOS.
External fields are useful for things such as associating and recording an external ID to a Canopy account or for tracking and segmenting. Note that these fields can then also be references inDataDirect queries for reporting purposes!
Payment Details
The Payment Details card provides key information about which payment processor an account is configured with and if they have autopay enabled.
Transaction History
The transaction history table on an account provides all of the transaction-level activity related to that account.
Clicking on the arrow next to a transaction will provide additional details and a breakdown of it. Notice how the details show change based on the transaction type.
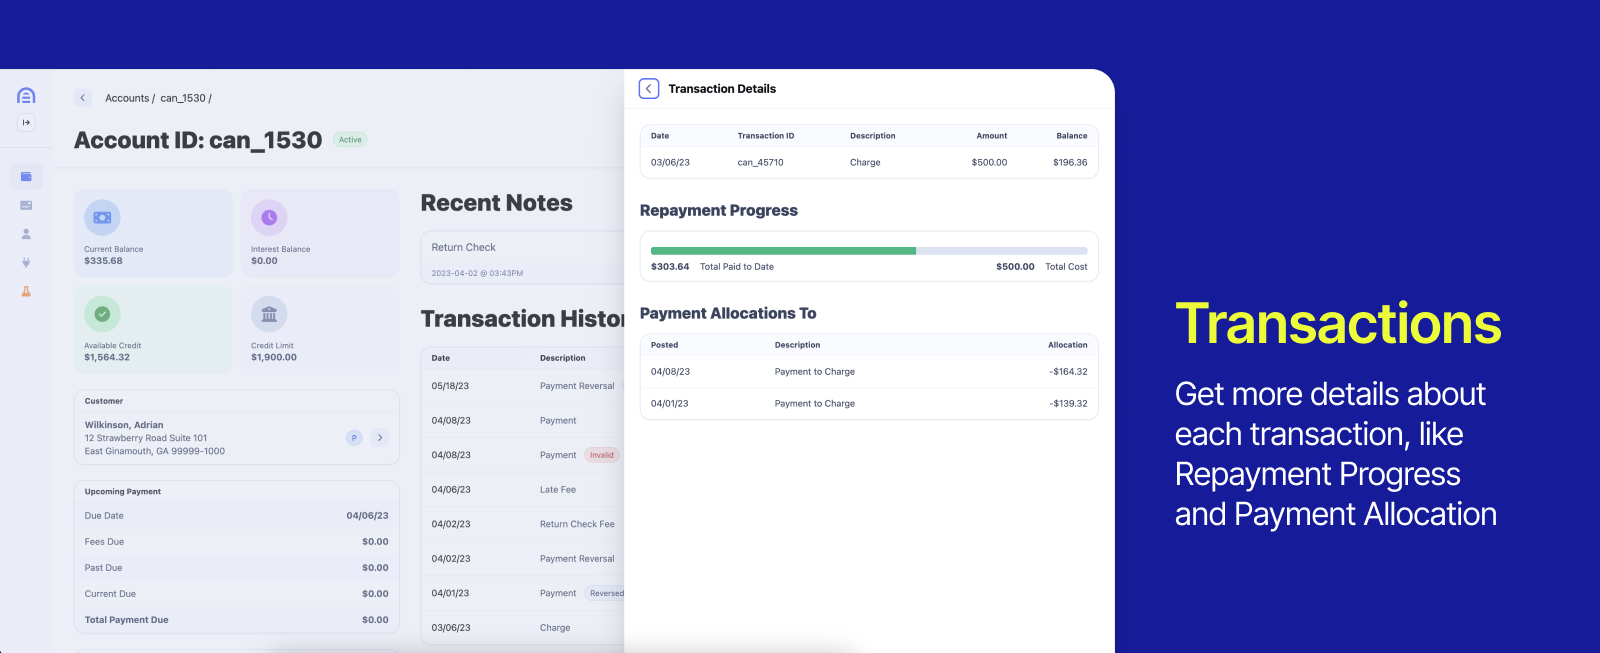
Payment Reversals
If you click on the arrow next to a payment transaction, you will also have the option to apply a payment reversal. A payment reversal will undo the payment as if it never happened on the account, including applying any interest or late fee effects that may be relevant.
Product & Account Configuration Settings
Some of the key information that affects the behavior of an account can also be found on the left panel of the account view.
Clicking on the arrow next to the interest rate will open a drawer showing the interest rate history for that account.
Statements
Once an account has completed a cycle and a statement has been generated, the key statement information can be found in CanopyOS as well.
Clicking View on a particular statement opens more details on that statement. Please note that this is just some of the key information for that statement. Additional details can be found and utilized through the API.
Checkout the Statements section for more details on how statements and cycles work within Canopy's system.
Amortization Schedule
If using an Installment or Multi-Loan product, you will also notice your CanopyOS account view includes an Amortization Schedule.
Standard Installment Amortization Schedules
If utilizing a standard installment product for an account, you will have a single schedule with all rows relating to your installment product.
Multi-Loan Amortization Schedules
If you are using a variation of our Multi-Loan Product feature, your main account view will show an aggregated amortization schedule.
Notice below that there are multiple records for a single due date. This is because this particular account has 2 installment loans created against a single revolving line of credit.
If you hover over the info icon on the far right, you will see the name of the loan in which that record relates to.
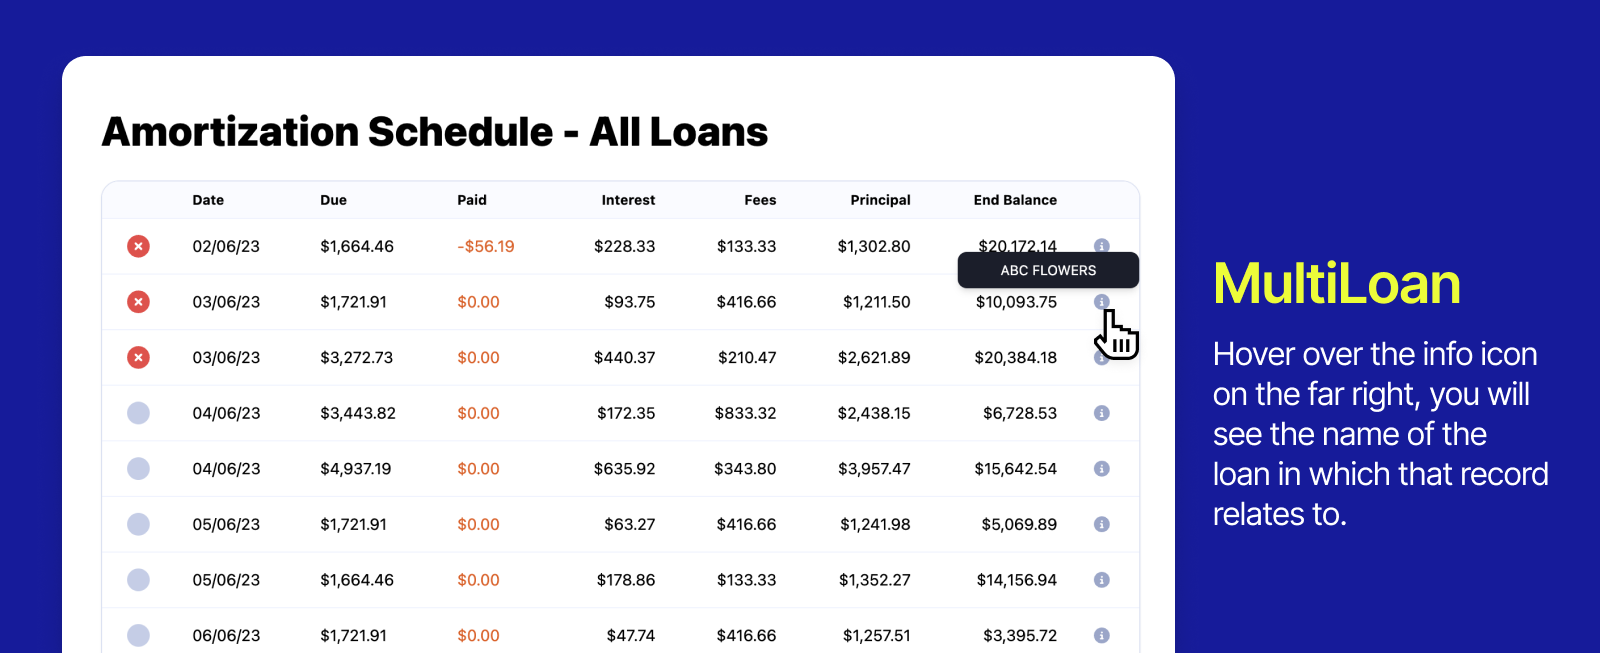
If you click on a particular loan on an account, you will get an amortization schedule specific to that account, along with some additional related information about it.
Manage Menu Servicing Functions
The Manage menu on an account provides a number of functions to allow you to service and manage your accounts.
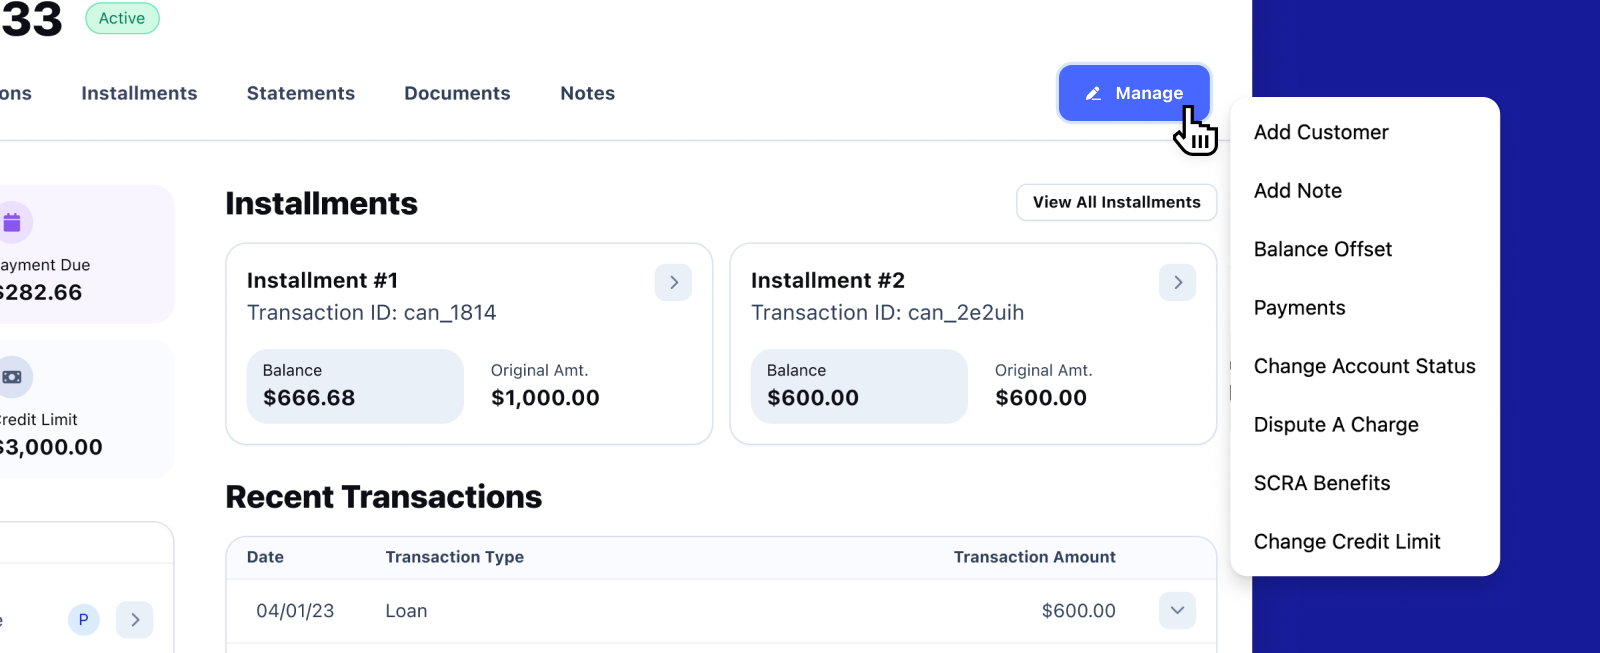
For more in depth infomation about enabling your agents and operators to manage and service accounts, please see the Loan Servicing section.
Loan Restructuring
Please see the Loan Restructuring guide to learn more about executing a restructure from within CanopyOS.
Account Tagging
Tag Options
Tags in Canopy are flexible, dynamic attributes or labels that you can associate with an account. They don't directly influence the system's behavior but are incredibly useful for categorization and contextualization. Tags are particularly beneficial for temporary or conditional information about an account, rather than permanent data. For instance, you might use tags to denote an account that requires review or to group accounts into specific cohorts.
Tag Options can be managed via API or through the Tag Option page in the Admin menu of CanopyOS.
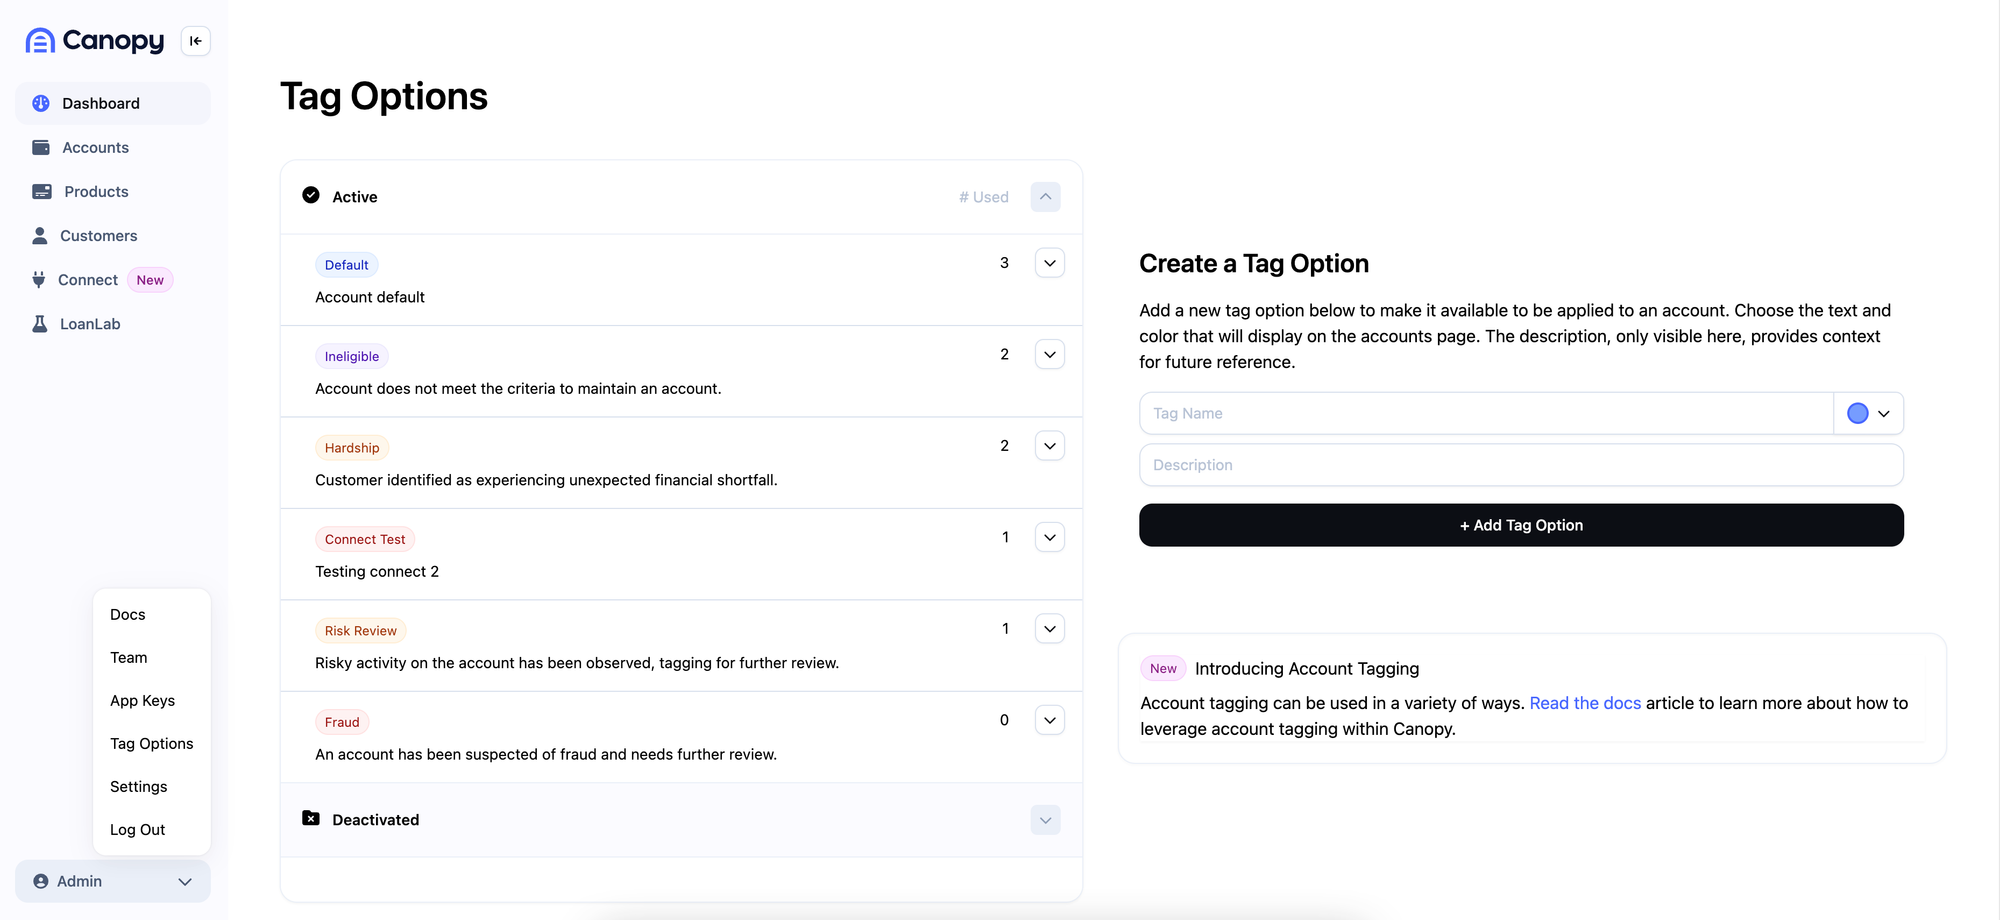
Adding a New Tag Option
New Tags can be added through the form on the right hand side of the page with the following options:
- Tag Name will be the text that is displayed on account view pages.
- The color selector allows you to choose the background color of the tag when it is displayed. This can help you quickly identity key tags. For example, you may want to create risk related tags in red, as opposed to informational tags, such as a cohort, in gray.
- The Description field is only visible from this Tag Options page and is intended to provide context for future reference.
Managing Tags
All available tags are listed on the left of the page with the "# Used" representing the number of accounts that Tag Option has been applied to.
Active Tags are those that can be applied to an account. Deactivated Tags will not be available as an option to be applied to an account, but it is important to note that deactivating a tag does not remove it from any accounts it has already been applied to.
Clicking the arrow next to an Active Tag Option will allow you to edit the color and description of the Tag as well as deactivate it if needed.
Clicking the arrow next to a Deactivated Tag Option will allow you to reactivate it.
Applying or Removing Tags from an Account
Tags can be applied or removed from an account by clicking on the "Manage" button on the Account Tags card.
Tag Options can be added, edited, and deactivated through the API. See details in the API Docs here.

Reporting & Webhooks
DataDirect contains three tables related to tags to assist you with reporting needs.
Accounts_Tags_Log: This table is an audit log of historical changes of tags that were applied and/or removed from a given account. [Data Dictionary Details]Accounts_Tags: a list of accounts and any tags actively applied to them. [Data Dictionary Details]Tags: a list of all Tag Options and their associated details. [Data Dictionary Details]
Account Tag Webhook
When a Tag is applied or removed from an account, you can now subscribe to webhook notifications of these events. This new webhook is also available in Canopy Connect to trigger workflows from.
account_tag_appliedaccount_tag_removed
Click here to go to our webhooks documentation to see example payloads.
FAQ
What’s the difference between Tags, External Fields, and Account Statuses? When do I use each?
- Tags: Tags in Canopy are flexible, dynamic attributes or labels that you can associate with an account. They don't directly influence the system's behavior but are incredibly useful for categorization and contextualization. Tags are particularly beneficial for temporary or conditional information about an account, rather than permanent data. For instance, you might use tags to denote an account that requires review or to group accounts into specific cohorts.
- External Fields: These are best suited for data that remains constant over the lifetime of an account. External fields are typically used to store stable information, such as external ID values from other systems, making them ideal for long-term, unchanging data.
- Account Statuses: Account statuses in Canopy are primarily used to represent an account's current state within the system, influencing its behavior. For example, an account might automatically be categorized as Active, Delinquent, or Charge-Off based on its creation settings and ongoing activity. While some existing account statuses like Risk Review and Fraud don't inherently alter system behavior, they are more effectively utilized as Tags. Given this, Canopy plans to eventually deprecate these status options in favor of Tag usage; there is no set timeline on this deprecation at this time.
There are Tag Options available that are the same as some account statuses, what's the difference?
Account statuses in Canopy are primarily used to represent an account's current state within the system, influencing its behavior. For example, an account might automatically be categorized as Active, Delinquent, or Charge-Off based on its creation settings and ongoing activity. While some existing account statuses like Risk Review and Fraud don't inherently alter system behavior, they are more effectively utilized as Tags. Given this, Canopy plans to eventually deprecate these status options in favor of Tag usage. While there is no set timeline on this deprecation at this time, we’ve seeded some of these options for you to get you started. You may deactivate these Tag Options if they are not of use to you.
What’s the difference between a Tag Option and an Account Tag?
A Tag Option is any attribute or label that you would like to be able to associate with account. An Account Tag is simple a Tag Option that has been applied to an account.
What does deactivating a Tag Option do?
Deactivating a Tag Option will remove it from being an option to be applied to an account. Please note that deactivating will not remove the tag from all of the accounts it’s already been applied to.
What is the purpose of the color and description setting on a Tag Option?
The Tag Option color and description is there to provide further and context and clarity.
The Tag color is the color that will show within CanopyOS with the goal of easier and quicker identification. For example, perhaps you want to choose Red for risk related Tags to call greater attention to them, but use gray for more informational Tags, such as a cohort.
Products
The Product page within CanopyOS will show you a list of all products you've created in Canopy's system. Clicking on a specific product will resent additional details.
Checkout the Products section to learn more about product creation and configuration options.
Testing & Experimenting
Looking to test and understand the system behavior on an account within Canopy's system? LoanLab allows you to simulate the entire lifecycle of a loan, test different policies and actions, and observe the effects over time (and in real-time).
Read more about LoanLab and what it can do for you here.